
Introduction
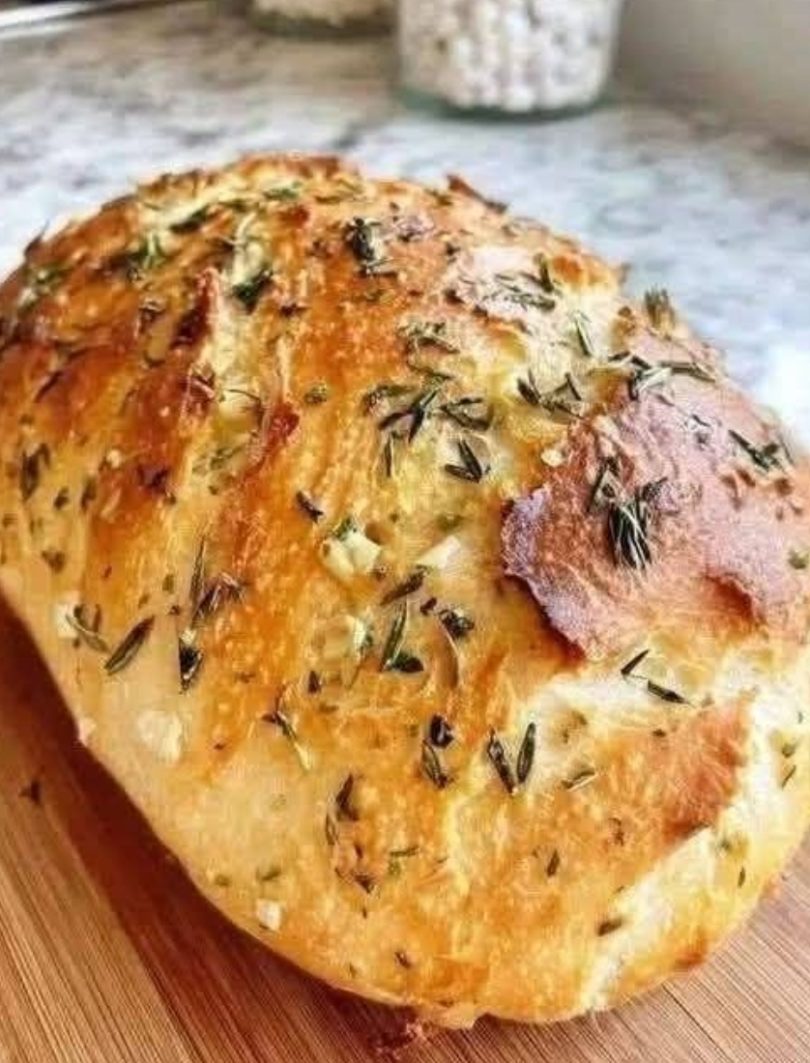
No-Knead Rosemary Garlic Bread is a rustic artisan loaf with a crisp, golden crust, a soft and airy crumb, and the irresistible aroma of roasted garlic and fresh rosemary. This recipe requires minimal effort because time does most of the work. During a long fermentation, the yeast slowly develops flavor while creating the beautiful open texture that makes artisan bread so special.
Perfect for beginners and experienced bakers alike, this bread pairs wonderfully with soups, salads, pasta dishes, roasted meats, or simply a drizzle of olive oil and a sprinkle of flaky sea salt. The combination of fragrant rosemary and savory garlic creates a loaf that tastes like it came from a traditional European bakery.
History
The no-knead bread method gained worldwide popularity in the early 2000s after artisan bakers demonstrated that exceptional bread could be made without extensive kneading. The technique relies on long fermentation instead of physical kneading to develop gluten naturally.
Rosemary has been cultivated around the Mediterranean for thousands of years and symbolizes remembrance, friendship, and hospitality. Garlic has been used in baking since ancient Roman times, valued for both its flavor and nutritional benefits. Together they create one of the most beloved artisan bread combinations.
Why You’ll Love This Bread
- No kneading required
- Crispy bakery-style crust
- Soft, chewy interior
- Rich garlic flavor
- Fragrant rosemary aroma
- Beginner-friendly recipe
- Minimal hands-on time
- Perfect for sandwiches and toast
- Freezes beautifully
- Great for entertaining
Preparation Information
- Preparation Time: 15 minutes
- Resting Time: 12–18 hours
- Second Rise: 45–60 minutes
- Baking Time: 40–45 minutes
- Total Time: About 14–20 hours
- Yield: 1 large loaf (10–12 slices)
Ingredients
For the Dough
- 3½ cups (440 g) bread flour
- 1½ teaspoons salt
- ½ teaspoon instant yeast
- 1¼ cups plus 2 tablespoons (330 ml) warm water
- 2 tablespoons olive oil
- 4 cloves garlic, finely minced or roasted and mashed
- 2 tablespoons fresh rosemary, finely chopped
- 1 teaspoon dried rosemary (optional for stronger flavor)
- 1 teaspoon honey (optional)
For Topping
- 1 tablespoon olive oil
- Fresh rosemary sprigs
- Flaky sea salt
- Extra minced garlic (optional)
Equipment Needed
- Large mixing bowl
- Wooden spoon
- Plastic wrap or kitchen towel
- Dutch oven with lid
- Parchment paper
- Cooling rack
Instructions
Step 1: Mix the Dough
In a large bowl, combine the flour, salt, and yeast.
Add the warm water, olive oil, garlic, rosemary, and honey.
Mix with a wooden spoon until a sticky dough forms. Do not knead.
Cover the bowl tightly.
Step 2: Long Fermentation
Leave the dough at room temperature for 12–18 hours.
The dough should double in size and become bubbly.
Step 3: Shape the Dough
Lightly flour your work surface.
Turn out the dough gently.
Fold the edges toward the center several times to create surface tension.
Shape into a round loaf.
Step 4: Second Rise
Place the dough on parchment paper.
Cover with a towel.
Allow it to rise for 45–60 minutes.
Step 5: Preheat
Place a Dutch oven with its lid inside the oven.
Preheat to 450°F (230°C) for at least 30 minutes.
Step 6: Bake
Carefully transfer the dough using the parchment paper into the hot Dutch oven.
Cover with the lid.
Bake for 30 minutes.
Remove the lid.
Brush the loaf lightly with olive oil.
Bake another 10–15 minutes until deeply golden brown.
Step 7: Cool
Transfer to a cooling rack.
Allow the bread to cool for at least 45 minutes before slicing.
Nutritional Information (Per Slice)
Approximate values:
- Calories: 180
- Protein: 5 g
- Carbohydrates: 31 g
- Fat: 4 g
- Saturated Fat: 0.5 g
- Fiber: 2 g
- Sugar: 0.5 g
- Sodium: 290 mg
Baking Methods
Dutch Oven Method
Produces the crispiest crust thanks to trapped steam.
Baking Stone Method
Bake on a preheated pizza stone with a pan of hot water underneath for steam.
Baking Sheet Method
Shape the loaf and bake on a parchment-lined baking sheet, adding steam during the first 15 minutes.
Tips for Success
- Use fresh rosemary for the best flavor.
- Roasted garlic provides a sweeter, milder taste than raw garlic.
- Do not add too much flour; the dough should remain sticky.
- Let the bread cool fully before slicing to preserve the texture.
- Store in a paper bag or bread box to maintain the crust.
Serving Suggestions
- With butter and flaky sea salt
- Dipped in olive oil and balsamic vinegar
- Alongside tomato soup
- With roasted chicken
- For grilled cheese sandwiches
- As garlic toast
- With pasta dishes
- With charcuterie boards
Variations
- Add grated Parmesan cheese.
- Mix in shredded cheddar.
- Include chopped olives.
- Add sun-dried tomatoes.
- Sprinkle sesame or pumpkin seeds on top.
- Add cracked black pepper or red pepper flakes for extra flavor.
Storage
- Room Temperature: Up to 3 days.
- Refrigerator: Up to 1 week (wrapped well).
- Freezer: Up to 3 months. Slice before freezing for easy reheating.
Conclusion
No-Knead Rosemary Garlic Bread proves that homemade artisan bread can be both simple and spectacular. With just a handful of pantry staples and a little patience, you can create a loaf featuring a crisp crust, tender crumb, and the comforting flavors of rosemary and garlic. Whether served fresh from the oven, toasted for breakfast, or paired with your favorite meal, this bread is sure to become a favorite in your kitchen.
Why Bread Lovers Adore This Recipe
People love this bread because it combines bakery-quality results with an easy, no-knead process. The long fermentation develops deep flavor, while rosemary and garlic fill the kitchen with an irresistible aroma. It’s a versatile loaf that’s delicious on its own, with butter, or as the perfect companion to soups, salads, pasta, and hearty family dinners.